How to Correct Bank Details in Manav Sampada Without HR 2026
Updating your bank account details in Manav Sampada is important so your salary, allowances, and other payments go into the right account. Usually people go to HR for this, but sometimes you can update it yourself — or at least kick off the process without HR help.
This article walks you through what you can do, what’s possible inside the portal, and safe ways to correct bank details without HR if the portal allows it.
Correcting your bank details in Manav Sampada without going to HR is often possible if the portal allows you to edit your profile or submit a correction request online.
Just follow the steps above — update your info carefully, upload clear proof, and submit. If you don’t see direct editing options, look for the correction request feature. Even then, the change is completed without directly visiting HR.

Can You Change Bank Details Without HR Support?
Short answer: It depends on your portal settings and access level.
In many departments, the Manav Sampada portal allows you to update bank info yourself and submit for approval without immediately involving HR. But in some cases, the system will still route it to HR or a DDO for final acceptance.
So the goal here is to update bank details in your profile correctly so the system can send them for approval automatically — without you having to walk into HR.You can also read:How to Update Your Profile on Manav Sampada in 2026
Before You Start: What You’ll Need
Make sure you have:
Having these ready makes the process smoother.
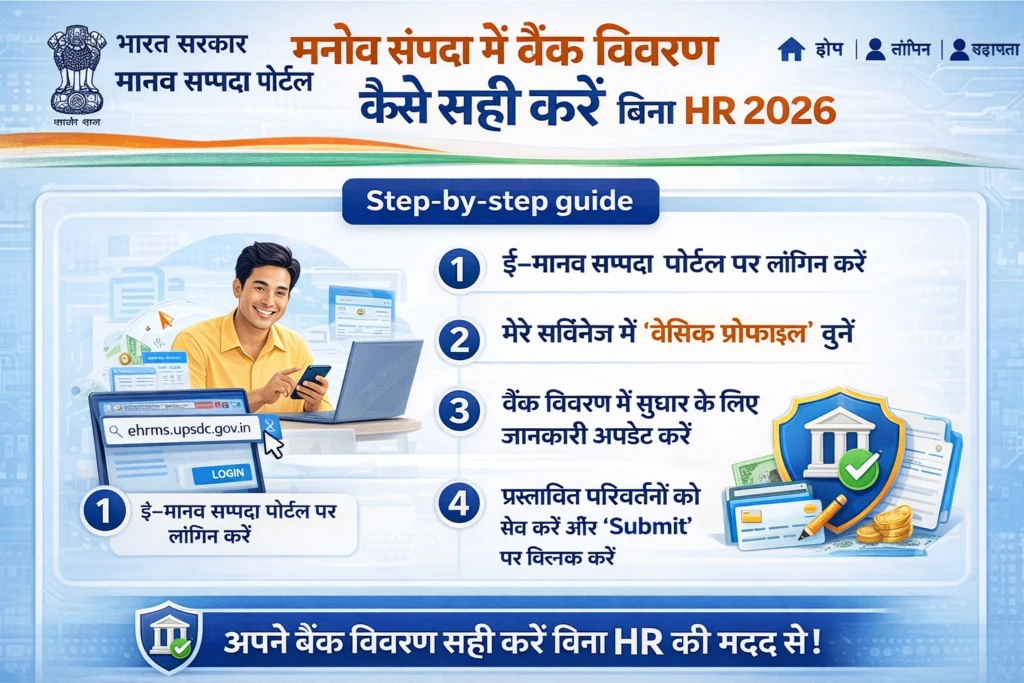
Step‑by‑Step: Update Bank Details in Manav Sampada
Go to the official Manav Sampada login page and enter:
- User ID
- Password
- Captcha (if any)
Then click Login.
Once logged in:
- Navigate to My Profile or Service Book
- Look for a section called Bank Details or Payment Details
This is where your current bank information is stored.
If the portal allows self‑update:
- You will see an Edit, Update, or Modify button next to the bank info
- Click that
If you do not see an edit button, it may mean your department has locked this field and requires HR/administrator approval first (we’ll cover what to do next).
Fill in the new details carefully:
- Account Number (double‑check it)
- Confirm Account Number (if prompted)
- IFSC Code
- Branch Name (if required)
Tip: Using a cancelled cheque or passbook photo helps avoid typos.
If the portal asks for proof:
- Upload a scanned copy or photo of your cancelled cheque
- OR upload a copy of your bank passbook first page
- Make sure files are clear and saved as JPG/PDF
This supports your change and helps avoid rejection.
When all details are correct:
- Click Save or Submit
- The portal may generate a request ID
- This means your update is now in the system for verification
Even if you don’t see HR in this step, the system will send the update to the appropriate officer for approval later.
What If You Cannot Edit Bank Details Directly?
Some Manav Sampada installations do not let employees edit bank details directly. In that case:
Option 1: Use “Raise Objection / Correction Request”
Many users see an option like:
When you choose that:
This creates a system request that goes to the HR/approving officer without you physically visiting them.
Option 2: Check for “Self‑Service” Update Tab
Some departments enable a Self‑Service Update tab under profile sections. If you see it:
This is the best way to update info without manual HR intervention.
Option 3: Use “Request for Approval”
If the portal asks you to send the update for approval, do it. The advantage here is that you don’t have to go to HR physically — the system sends it for approval online.
Tips for a Smooth Update
These small steps prevent errors and rejections.
Frequently Asked Questions
Final Thought:
Correcting your bank details in Manav Sampada without going to HR is often possible if the portal allows you to edit your profile or submit a correction request online.
Just follow the steps above — update your info carefully, upload clear proof, and submit. If you don’t see direct editing options, look for the correction request feature. Even then, the change is completed without directly visiting HR.
If you’d like, I can make you a simple checklist you can save or print for this process!


